Raspberry PI, e-paper screen and displaying information from home

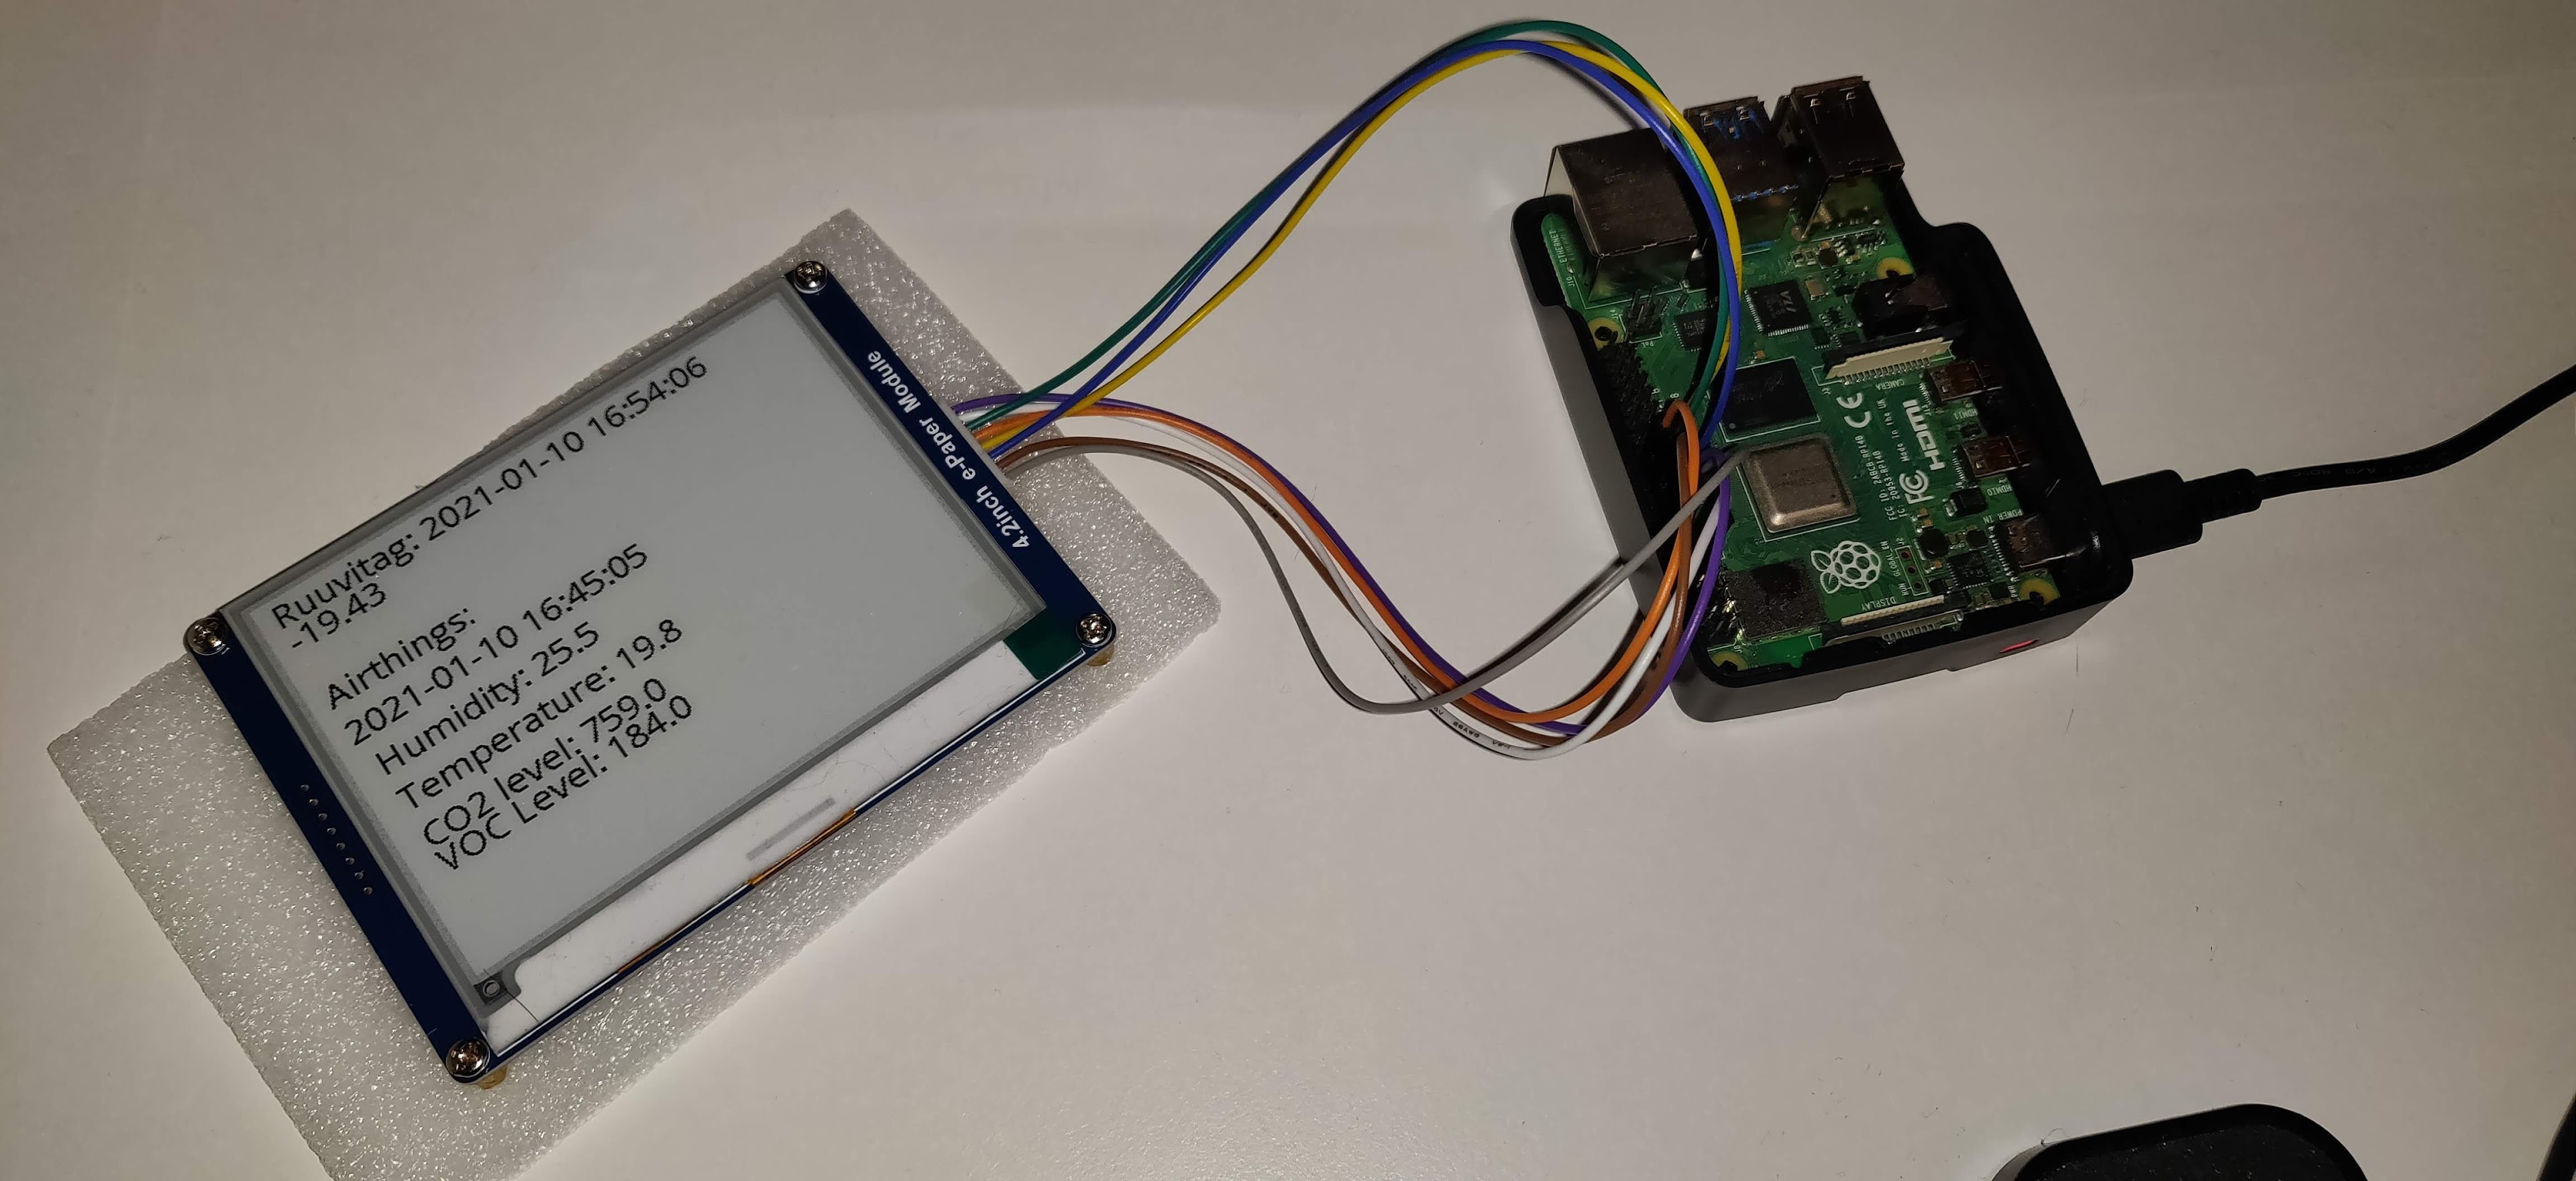
As for next step in my home monitoring set up with Raspberry I’ve obtained Waveshare 4.2 inch e-ink screen to display selected information from my Raspberry easily without fetching phone or tablet to view through those. Primarily I intend to fetch outdoor temperature information and few other informations. As you can see the project is still a bit in “development” at least on casing wise, but on last weekend I managed to get all info to be displayed and updated as intended. I were familiar with e-Ink / e-Paper from using ebook readers and I like about the idea of “when powered off the screen displays what it had and only little power is needed to update the screen”. Of course this screen does not have backlight but it is smaller issue than having 24/7 bright led screen or similars .

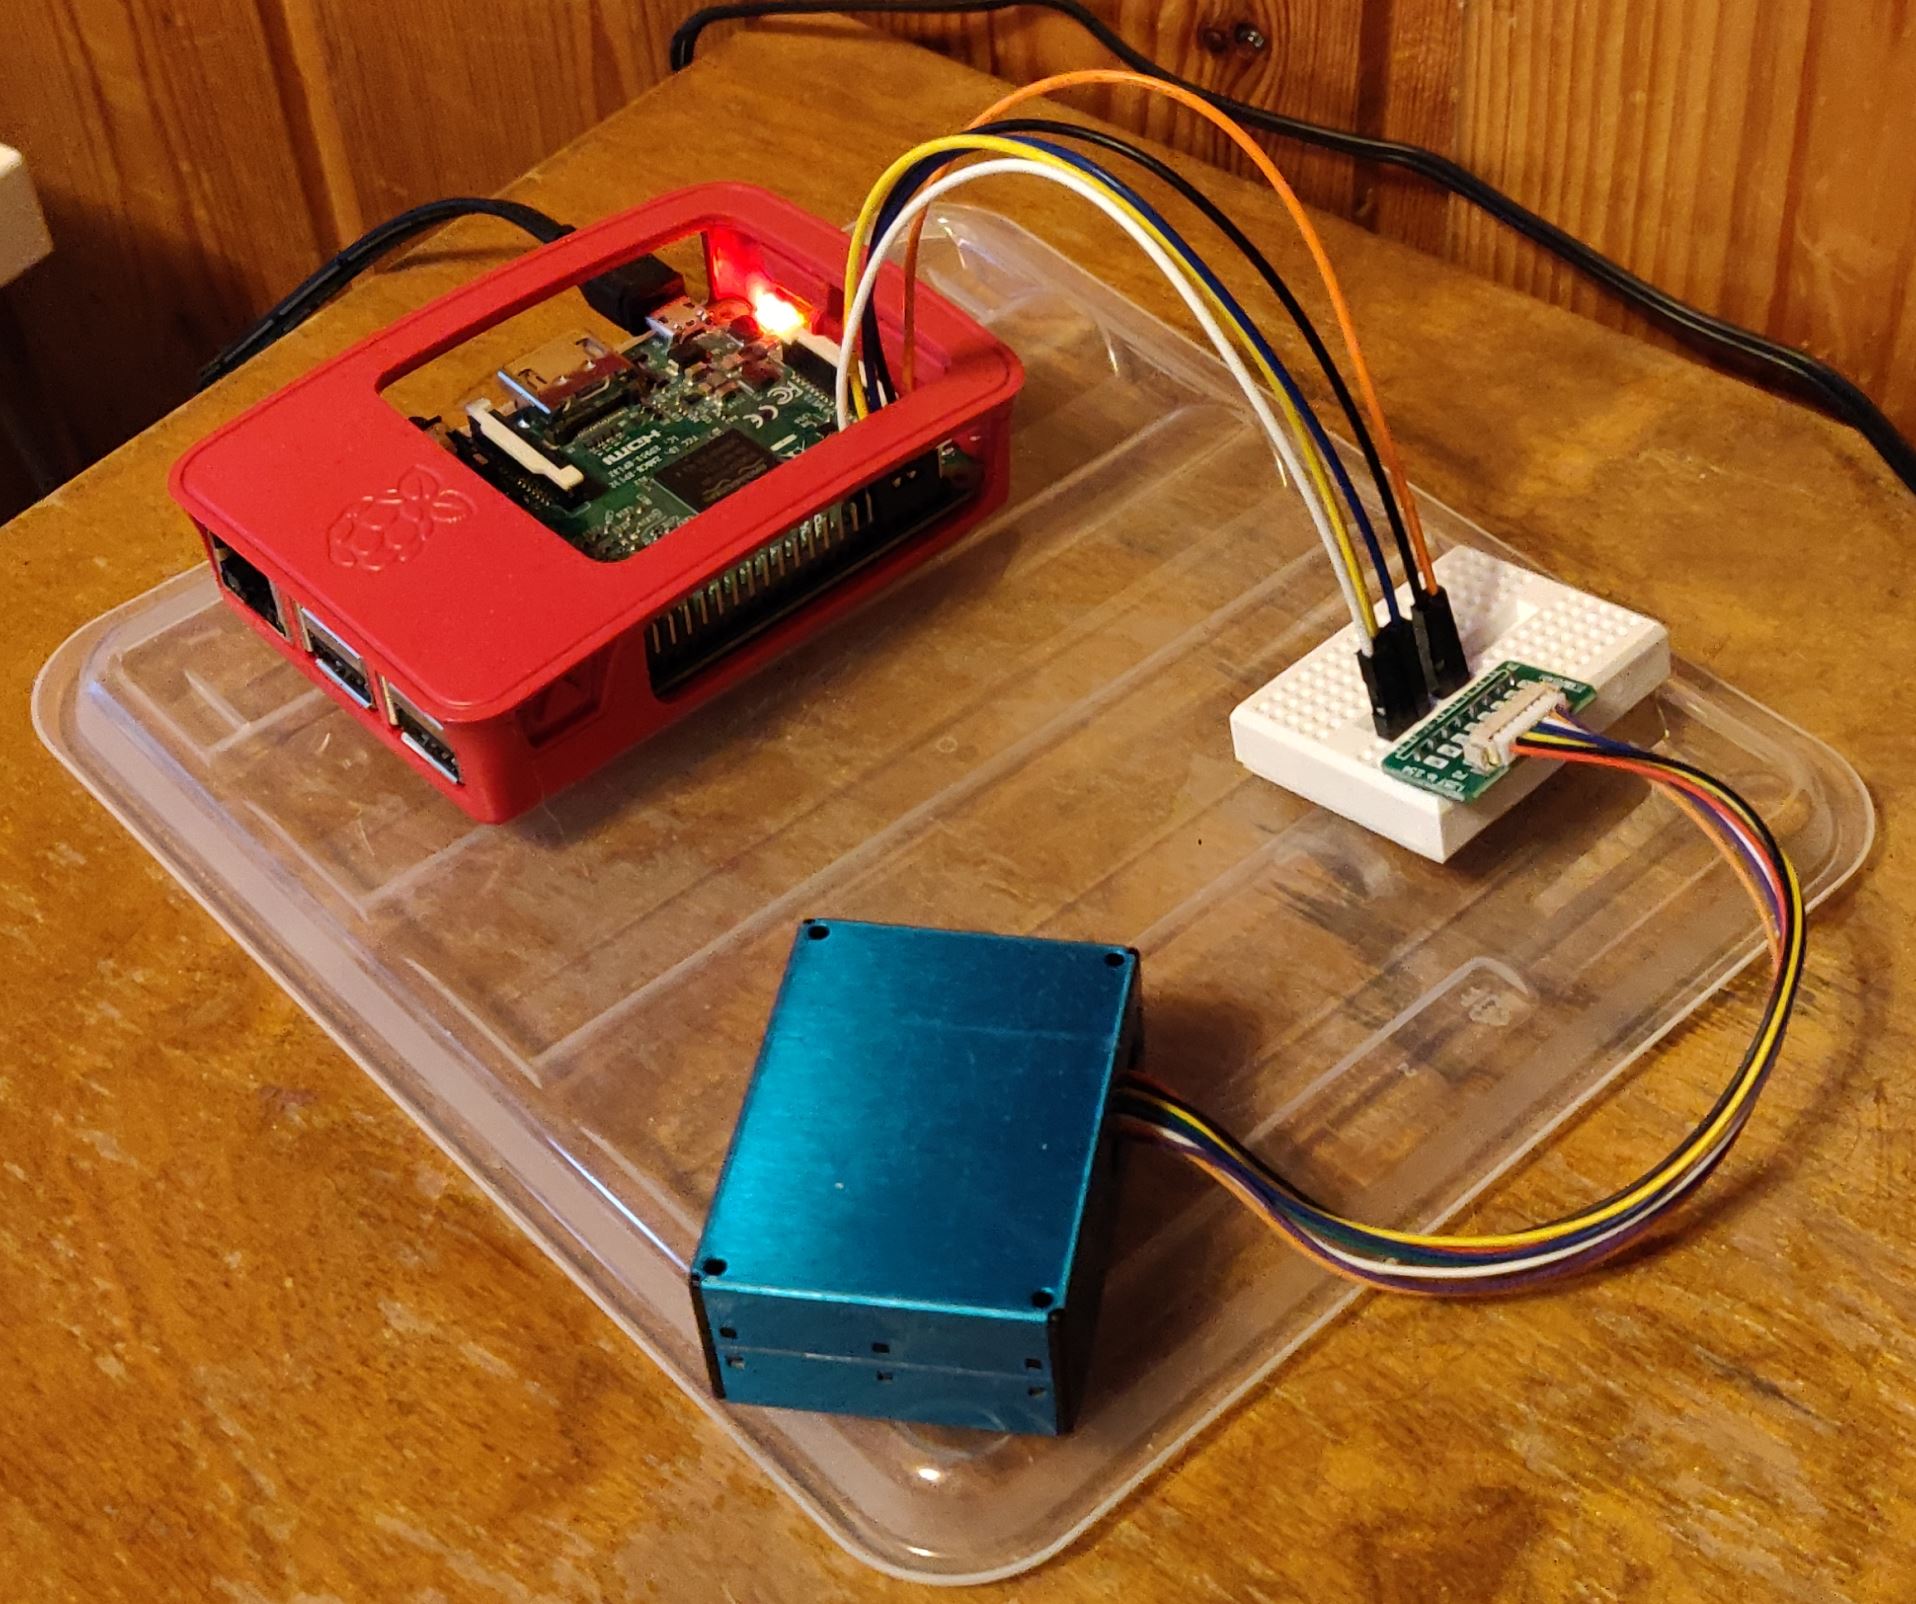
For quick background a few years ago I got familiar with Ruuvitag (https://ruuvi.com/) and have couple of these little devices around the house to report temperatures. I placed one of these devices to outdoors (with wide temperature range battery just in case if and when temperatures drop low on winter, https://shop.ruuvi.com/product/ruuvi-cr2477t-wide-temp-battery/).

Ruuvitag

As previously I wrote another device that I currently have in use is Airthings Wave Plus indoor air quality monitor near my daily working spot.

Information from both of these devices are collected through Bluetooth in Raspberry and displayed in e-ink / e-paper screen (and also uploaded as CSV into Dropbox for storage and further processing if needed).

So how all of this are put together?

RuuviTag part:

At first information from Ruuvitag is collected utilizing libraries and examples from here: https://github.com/ttu/ruuvitag-sensor . I went through experimental Bleson libraries since I like to look solutions with more possible lifespan and due to stability reason. Previously I attempted to get Ruuvitag to work with Bluez and in Raspberry PI 3 b+ but unfortunately this seemed to be pretty unstable combination. The code ran sometimes for hour or couple but then whole Raspberry ended up not responding mode (not even answering to SSH). After spending time with Google I found out that Bluetooth seemed to be little problematic with that specific Raspberry. Luckily I had newer model also to work with and now code has been running nicely. (Raspberry PI 3 b+ did good job at collecting data from Airthings device but this Ruuvitag journey was little bit too much for that).

For Ruuvitag and Bleson enabling I had to do few additional steps (mainly installation from here https://bleson.readthedocs.io/en/latest/installing.html) and some permission adjustments per each step when trying to get examples working. Like always one step at the time and one problem at time for solving. There was decent amount of “head scratching”, but not too much and I should have logged these down to be able write in depth posting. At least one clear issue was with seeing much “End Of File (EOF). Exception style platform” exception from attempting to read Ruuvitag data and I think this was primarily solved with granting permissions for used user account to access bluetooth and some setcap commands from Bleson documentation.

Now I have Ruuvitag’s information collection running every 5 minutes (cron job) and data is stored into to CSV file & uploaded to Dropbox (just to be able to check how cold it has been).

Airthings part:

Information collecting from Airthings is being ran as posted in previous post every 7 minutes (just in case not to fire these two at same time) and data is also saved in CSV file and then uploaded to Dropbox just in case.

Waveshare e-Ink screen:

And now the final part: the screen. I utilized this guide to set up the screen https://medium.com/swlh/create-an-e-paper-display-for-your-raspberry-pi-with-python-2b0de7c8820c and ordered Waveshare 4.2 inch E-Paper module (nice size for my use and cost efficient choice). Another choice would have been e-paper HAT, but I wanted to have GPIO pins easily available for further usage. Waveshare 4.2 e-paper module came with necessary cable to connect the screen with GPIO pins as mentioned in article. With examples from article and Waveshare (https://www.waveshare.com/wiki/4.2inch_e-Paper_Module).

After getting the code working and figuring out what to print into screen and where I set screen updating to happen every 5 minutes on “wake hours” and once in a hour on night time.

During screen updating, the displayed information is being collected from CSV files with idea of “take last line from CSV” and parse needed info from these lines (both devices are reporting a bunch of data and selected information pieces are displayed on the screen).

For next steps I really need to start planning to have database where collect the information. So far it has been very fast way to store data into CSV and display from there, but limitations are coming with this and I have been looking into Influx for visualisations of data that I am collecting. We’ll see where the journey takes me next.

Posted in Raspberry | Leave a comment

Next level in indoor air quality monitoring with Airthings

As previously posted, there were some challenges with CO2 level monitoring. Luckily this year’s Black Friday sale included the thing which I were drooling for long time: Airthings Wave Plus with good discount.

Airthings Wave Plus

From ready made indoor air quality monitoring devices, this stood up best for my purposes. The device includes CO2 and VOC monitoring together with other sensors (Radon, Temperature, Humidity). Most importantly, Airthings reports results through Bluetooth and there are libraries and examples how to read there results with Raspberry. This allows me to read results with Raspberry on given interval and combine findings with other sensors like PMS5003.

On last weekend I hooked up Airthings with Raspberry utilizing Kogant’s fork of the Airthings example (https://github.com/kogant/waveplus-reader) and with little modifications I set up Raspberry to record Airthings values every 5 minutes into CSV file, upload it to Dropbox and from there I can access it with any needed device (usually by phone and with PC to create graphics from report).

Now calibration period has been passed and Airthings is reporting CO2 values nicely. Values are looking to be around 450 ppm to 960 ppm. We’ll see how this device behaves on longer monitoring period. However my window replacement is coming on January so it will be interesting to see how CO2 levels start to behave when air intake is improved.

Also for side note about Radon: in a few years back I had Radon measured with Stuk (https://www.stuk.fi/palvelut/radonmittaukset) on this location and it seems that Airthings reports same kind of Radon values (I’ll need to dig into archives to find report paper with exact values but I remember that this location is not affected with Radon issues).

Posted in Raspberry | Leave a comment

Experiences from indoor air quality monitoring and next steps

At the beginning of this year I wrote about “D-I-Y” indoor air quality monitoring set up with Raspberry, BME680 and PMS5003. I had this set up running from beginning of February to beginning of June and here are some of the findings.

At first experiences from the PMS5003.

PMS5003 with Raspberry

This unit proved to record pretty nicely particle data from indoor air. Almost instantly after getting the data from first days it came clear that when I fire up heating system (burning wood) the PM 1.0, PM 2.5 and PM 10 measurements started to go up with small delay and this behaviour repeats itself every heating day so there is correlation. As result of this I can see that there is a need to go through possible ways where smoke can get in and seal those routes (more about these “corrective actions” at the end of this posting).

For other correlations with PM levels rising there was clear connection with cooking (especially with frying pan). What was more interesting, the cleaning with vacuum did not spike the PM levels in repeating manners.

Findings from wood burning were not noticeable with nose or overall feeling in house (of course if there was someone else who walked in during heating period then there could be some small “how it smells” effect, but these small particles are something what you don’t know until with excessive amounts).

As for quick summary, the PMS5003 is quite good and reliable way to monitor particles in home use. There is still minor caveat with my set up with “life cycle”. It appeared that Raspberry does not easily allow shutting down 5V GPIO pins so it runs constantly and most likely this device will give up within year or so. However on the other hand when it runs constantly the numbers which it gives are most likely to be more accurate than with strategy of shutting down and starting up.

So then with BME680 sensor. For quick background I’ve utilized BSEC libraries to read data from the chip and had temperature adjustments in place to ensure at least few known parameters to be right way.

At first readings and measurements seemed to be about right (eCO2 values ranging from 500 to 1000) and there was expected correlation with spending time in same room caused values to raise and opening window & raising outgoing air speed lowered the numbers.

After month or so the more interesting findings started to appear. When I checked the results I noticed that for some reason the eCO2 and TVOC levels started to spike. This spiking was like from 630 ppm to 1070 ppm within 15 minutes (I had this set up to record values every 5 minutes) and what was most interesting was that during this time the room was empty (spikes were like 5 am or middle of night or times when nobody were in the house at all and no one sleeps at this room or near it, outgoing air was constantly on). Then after some time even more worse spikes started to appear: eCO2 levels from 630 ppm to ~2000 ppm within 5 minutes and “worst cases” were around 4000 to 7000 ppm which were clearly not possible values since I am standing and breathing here.

When these spikes occurred the other readings from BME680 seemed to be right: correct temperature, IAQ Accuracy in 2 or 3 (best ones), humidity ok, GAS Ohms within normal looking levels but spike in VOC’s which is used to calculate eCO2 reading. These spikes did go away quite fast, within 5 or 15 minutes.

I did not find clear explanation for this behavior or how to “cancel it out” in reliable way, but one thing came back to my mind from “research phase” when I were looking for this chip and way to measure CO2 values. At the nature of measuring CO2 levels, the measuring can be done in two different “mainstream” ways: by utilising actual infrared sensors (like ndir) or using VOC sensing and then calculating “equivalent CO2” -numbers. In my case eCO2 is result from VOC sensing and there can be something “just little off” to cause these kind of results. So using cost efficient sensor had drawback. However from data you can figure out “regular levels” of eCO2 values and deal with these spikes. And also I admit there is a lot of room for errors while setting up chip itself and code (there are a lot of parameters to change and adjust etc).

As for conclusion: even with some issues with CO2 sensing it came clear that there is need to do following activities: at first there is matter of small particles. There is so clear correlation with wood burning and numbers rising which means, that “not so health friendly” stuff is flowing in from somewhere into room where I spent good amount of time. So there is need to seal correct places and also adjust air amounts coming in and out. Air pressure and air flow comes into action from finding on cooking: apparently there isn’t sufficient air out take in kitchen since other rooms are getting higher particle numbers.

Since I am living in mid 1980’s house there is also matter of getting fresh air: this house is built in a way that air outtake vents are placed in rooms, but intake vents are not present so “replacement air” is taken from everywhere not in controlled way.

So to correct this problem I’ve chosen to do window changing project. With new window there is air intake vents which can be set on “winter” or “summer” operating mode: during winter time air is taken from mid space of window to heat it up little bit and in summer air is taken directly from outdoor. These vents also include filters which hopefully do not allow worst things to come in. This change tackles a few of my indoor air problems: to get replacement air in, seal “windy” or “leaking” window, change indoor air atmosphere & pressure in a way that replacement air is not taken from furnace or heating spaces to lower particle counts in indoor air and hopefully save some with heating expenses.

Posted in Raspberry, Uncategorized | Leave a comment

Raspberry PI & Home indoor air quality project

Recently I’ve been doing a small “hobby” project with Raspberry PI. Last year (2019) during winter season I did set up Raspberry PI Zero WH to monitor outdoor temperatures together with heat water temperature monitoring (DS18B20 & 1-wire approach, there are many good examples where to pick & follow). In my “data processing” set up I’ve been lazy and I’ll just collect temperature readings from every 15 minutes, put them on CSV file and upload it to Dropbox. From Dropbox I can easily check current temperature status and need for heating with any device at hand, locally or remotely.

On this year I’ve been interested in indoor air quality situation. I have been planning to do some enhancements like fresh air intake valves, but before drilling holes to walls I thought to monitor and check what is my current situation.

Initial steps… Ready made indoor air quality monitor?

For this task at first I had to do some learning and deciding what to look for and monitor in my home. On very first steps I did some market evaluation of devices what are currently in market. There is quite many different vendors and devices present on the market, but there are some drawbacks in devices as well. Firstly there is issue of what is being monitored: I was interested in capturing CO2, VOC’s and particulate matter. Combination of all these in single device was not successful (usually that particulate matter is something that does not  fall in ready made devices).  I chose particulate matter monitoring due to my current heating system (wood burning, will be replaced some time in future).

At first I thought to discard particulate matter monitoring and gave some deeper insights to ready made devices. I were looking for device which could be accessed through Bluetooth (since I have already Raspberry present on my set up and it would be logical to utilize it). It was quite surprising to see that Bluetooth readable indoor air quality monitors are not that common (at least with any “name brand” manufacturers).

Many of these indoor air quality monitor manufacturers utilize today idea in which device is connected to WIFI and it reports values to “cloud service” and if you want to access that data then you would do the round trip to service, fetch the information and then do whatever you’ll want to do with it. This was particularly “hairy” finding: it does not take long to figure out what happens if device manufacturer goes out of business or decides that “this device is not supported, buy new one”. Also security comes to mind as well: yet another device (or a hole) in network which might not be as up to date as it should be. Even some additional considerations came to mind as “what if someone else accesses this service where my device is reporting? It is easy to learn daily cycle of when persons are at home and when not based on data from indoor air quality monitor”. CO2 level is quite clear indicator of being home or not. And of course finally it comes down to price of the monitors.

Build your own…

Initially I was a little bit reluctant about building this indoor air quality monitor completely from sensor level since I my soldering skills are next to none (self learned) along with experience of electronics. However with issues from previous steps in ready made devices, it was quite easy to accept the challenge and to look for suitable approach with “chip” or sensor based based approach.

After some searching (primarily “Raspberry PI + Indoor air quality” search terms) I chose Bosch BME680 and Plantower PMS5003 to serve my needs since these looked most easiest to hook up and get things going.

BME680

There are quite lot of examples how to build and configure BME680 and I used multiple different sources to verify what I am doing on wiring wise like https://learn.adafruit.com/adafruit-bme680-humidity-temperature-barometic-pressure-voc-gas/python-circuitpython#python-computer-wiring-6-3 and https://learn.pimoroni.com/tutorial/sandyj/getting-started-with-bme680-breakout for wiring part. On code side I first utilized Pimoroni’s Python library to see that things are working as intended. Then little later I switched to Bosch BSEC software with example from https://github.com/alexh-name/bsec_bme680_linux as starting point. Bosch BSEC allows to gather much more information compared to Pimoroni’s library and there is also some amount of Bosch’s proprietary algorithms/calculation formulas to calculate air quality and the documentation is very good for Bosch BME680 library.

However now after about month, I can see some cons on this BME680 approach. BME680 provides actually eCO2 value is calculated from VOC sensor readings and it looks that it is not always accurate and requires “actual” changes in indoor air / surroundings to be measured correctly (this is most likely due to nature of eCO2 sensing).

BME680 provides “IAQ Accuracy” value which indicates how accurate other values are (on scale 1..3 where 1 is like “background history uncertain” and gas sensor data too stable to form value, check exact details from here for example, and 3 is most accurate). For my case I keep on getting IAQ Accuracy value of 1 about 90% of the time and only in few rare occasions I’ll get IAQ Accuracy value 3. This also relates to co2 and VOC values (when accuracy is 3 then usually co2 and voc values are also higher compared to measures when accuracy is 1). However this is trade off that comes with price and features (BME680 is well available and pricing is nice for “home enthusiasts”). As for improvement I would next look for NDIR co2 sensor which should be more accurate as it measures “what is exactly in the air” for co2 readings.

Picture from “development stage” set up on one of the Raspberry PI’s:

Temp2_bme680.JPG

PMS5003

Plantower PMS5003 is sensor that can provide estimation of particulate matter air. This model is quite well available and pricing is also friendly for “home enthusiastic”.  For wiring side on Raspberry, I have utilized at least https://www.rigacci.org/wiki/doku.php/doc/appunti/hardware/raspberrypi_air and https://www.hackster.io/OxygenLithium/particulater-air-quality-monitoring-for-everyone-3caef2. (I purchased actually “Adafruit PMS5003” which came with nice little additions to connect easily to breadboard, remember my soldering ;).

It is worth to know that PMS5003 utilizes laser diode inside device that has certain life span (about 8000 hours, source for example here). At first I planned to utilize some logic on Raspberry to switch on and off PMS5003 as needed, but after some searching it came quite clear that 5 volt GPIO pins can’t be turned off on Raspberry. However I pushed forward and got PMS5003 nicely to report particulate matter in indoor and lifecycle management for that is on “planning”.

For PMS5003 it was actually quite fun to see for example spike in readings when wife was cooking on another room when I were not in house (just asked that did you make breakfast at that time) and I can also see spikes when wood burning is on in my house (and this is clearly something which I’ll need to pay attention and correct.

As for future development for PMS5003 I’ll need to figure out how to utilize “switch on and off” in good way. I had some thought about wiring it to USB port on Raspberry which should be one way (USB ports can be toggled on and off at the expense of ethernet port, but my setup is on WIFI so that expense is not a problem). Also ESP approach could be something to look into.

From “development set up”:

Temp1.JPG

For both of the sensors I added some additional code: each device is able to report sensor readings on second basis, but it is not so good idea if you are running the set up as I am: from SD Card on raspberry (it would be quite easy to write out lifespan of SD Cards with recording values on every second). I made addition to codes in a way that values are captured as sensors are reporting those, but these are stored in memory and average is calculated when writing to CSV file moment comes to (did some timing and and “round counters” etc to cause CSV writing every 5 minutes (at some point I’ll adjust this to 15 minutes).


Summary

As it seems this ended up into rather lengthy post, but sometimes you’ll get little bit carried away with topics which are on the mind 🙂 And of course there could be lots of more details in here, but that’s something for the future if I get more inspiration. There were also lots of different steps in each of the devices which had some “why this is not working” and “what’s happening now” but luckily those were quite easy to sort out with searching.

As for analysis of the results, the CSV files are easy to import into almost anything for further digging.

Posted in Raspberry, Uncategorized | Leave a comment

From Azure Scheduler to Azure Function Apps (with SharePoint flavour)

Another area where I have been spending some time and thinking that this is worth writing about is Azure Scheduler. I have been using Azure Scheduler to do certain amount of work on SharePoint with Client Object Model. As on last September/October 2018 I received information that Azure Scheduler is going away and need to plan out where to go.

After some thinking and digging, ideally most tempting approach is to go with Azure Function Apps since in here we have possibility to use “timed” trigger. As in more details with Azure Function Apps, there are two versions currently, V1 and V2. V1 supports .NET Framework only and it seems to be considered “as is” and not developing anymore. So with this background more tempting approach is to go with V2.

Now things get really intresting with V2 & SharePoint: V2 does not support .NET Framework. In practise this means that using applications such like console application built with .NET Framework to connect to SharePoint Online with Client Object Model does not work.

To get around this problem, there are at least two choices (one better one and another not so nice). I have not spent too much time with digging into details with this, but I’ve been more into “try this in real to see if it works or not”.

So at first the not so nice way: It is possible to have “wrapper” in Azure Function App (run.csx) that calls Process.Start() and to have your own “old school” .NET Framework compiled exe run in there (just upload your exe along everything what the exe needs to correct folder in Azure and there you go). I did some additional researching with this and were able to capture outputs from exe file too. Just a quick example picture from Function app’s run.csx:

Example_csx

That above way works, but it is smelly and I would not like to make any long term commitments with that approach.

Then the better way: .NET Core & SharePoint way. For this better way I have written separate blog post that covers how to get SharePoint Client Object Model work with .NET Core and this can be then utilized together with Azure Function Apps the easier way.


Posted in Azure, SharePoint Client Object Model | Leave a comment

SharePoint (Online), Client Object Model and .NET Core

I have not been writing these posts for a loong time, but here I am again. Lately I have been checking into .NET Core and SharePoint Client Object Model (as a side note I have been working all the time with SharePoint and Office 365, mainly with Client Object Model & “backendish” stuff).

So currently as I am writing this posting, the SharePoint Client Object model and .NET Core support seems to be very “lightly” documented and not so much of content is existing currently.

However before we get started, I’d like to thank Raju Joseph (https://rajujoseph.com/getting-net-core-and-sharepoint-csom-play-nice/) for the post & pointer about how to get things working with .NET Core and Nuget packages with SharePoint Client Object Model. To quick summary from Raju’s posting currently “official” Nuget package for SharePoint Online (Microsoft.SharePointOnline.CSOM) contains .NET Core compatible DLL’s under “netcore45” folder where SharePoint Client Object Model packages can be referenced from (.portable -named DLL’s per need) + additionally to get things really working in Microsoft environment, you’ll need to add reference to “Microsoft.SharePoint.Client.Runtime.Windows.dll” from “net45” folder. If you try to connect to Office 365 SharePoint “Online” from .NET Core application without these correct “portable” DLL’s, you just get error similar to: “System.Net.Requests: The remote server returned an error: (400) Bad Request.”

As another side note: Visual Studio’s Nuget package manager seems to be a tricky with this SharePoint Client Object Model situation and I found myself manually adding references to correct DLL’s. As minimum references I’ve added following DLL’s to get simple ClientContext work as intended:

  • Microsoft.SharePoint.Client.Portable
  • Microsoft.SharePoint.Client.Runtime.Portable
  • Microsoft.SharePoint.Client.Runtime.Windows


So then to actual beef what comes as findings from using these “portable” versions of SharePoint Client Object Model DLL’s which I spotted quite fast after brief checkup:

  • Portable versions do come with only “async” flavour, for example:
    • ClientContext.ExecuteQuery() is not existing, only ClientContext.ExecuteQueryAsync().
      • Quick and dirty approach to convert your old code could go with replace ExecuteQuery() with ExecuteQuery().Wait() which seems to work at least in quick testing.
    • File.SaveBinaryDirect() (Microsoft.SharePoint.Client.File.SaveBinaryDirect() ) is missing and you’ll need to set up your strategy of file saving with suitable route described for example in here: PnP Core LargeFileUpload 
      • This SaveBinaryDirect() missing is quite cumbersome change since you’ll need to rethink much stuff around file upload if your scenarios happen to contain large files. Previously this SaveBinaryDirect() did wonderful job in saving files to SharePoint without too much headache of file sizes, but in current “portable” files you’ll need to pick best route according to your use scenarios.
    • File.OpenBinaryDirect() is missing too but I’ve seen that OpenBinaryStream() is quite straightforward replacement for this.
      • You’ll need to use “.Value” from OpenBinaryStream()’s to get what previously was coming directly from OpenBinaryStream()

I bet there are lots of more these kind of “minor differences” with .NET Core compatible versions of SharePoint Client Object model, but these were the first one’s for me and these even triggered me to dig up this old blog and re-heat it.


Posted in SharePoint Client Object Model, SharePoint Online | Tagged | 3 Comments

SharePoint 2013 ClientPeoplePicker

Okay we and I have been stumbling around with this neat new control named ClientPeoplePicker in SharePoint 2013. One on the interests in this control is to use it in own web parts. Now if you just simply add the control to web part (or aspx page), you’ll get it working like charm.

However default approach limits the ClientPeoplePicker to return only users from SharePoint, the ClientPeoplePicker does not return SPGroups or Active Directory Groups or Security Groups nor Distribution Groups. As for the default use in SharePoint built in forms/web parts do allow SPGroup to be returned to screen so it is more of the configuration side.

Fortunately after some digging I were able to find out more to this. At the PeopleEditor, default limitations for the results are defined with “SelectionSet” which accepts string containing what is desired (btw. in SharePoint 2013 this will also be set on “User” only, can’t remember correctly was this on default at SharePoint 2010). Now at the ClientPeoplePicker this property is named PrincipalAccountType. By default the PrincipalAccountType is set to “user”. Changing this value for example “User,SPGroup” will allow ClientPeoplePicker to return users and groups. Also there is possible to use “User,SPGroup,SecGroup,DL” selection which will return almost everything you can possibly want from Active Directory.

Currently MSDN documentation does not say anything extra on this property, but that is sure to change at some point. Enjoy if you happen to be stumbling in this topic.

Posted in SharePoint 2013 | Tagged | 1 Comment

SharePoint & IIS & HTTP 500 error

Sometimes I’ll have to wander around a bit less developer side and more into admin side. Now here is one interesting challenge: SharePoint site started serving HTTP 500 error and nothing more after install of 3rd party software.

This problem was quite bit odd since the event viewer & logs seemed to be allright, no findings there. After good while of investigating I managed to scoop out IIS Logs and followed as I tried to re-open site. When I found my browser requests from IIS logs I found out the additional “sub error message”, sc-substatus 19 -message (the line went like sc-message 500, sc-substatus 19). Now at the IIS 7.5 these messages indicate more serious problem inside IIS configuration and some ideas were thrown around about reinstalling IIS or restoring IIS Metabase.

Keeping this in mind I just hit the old fashion “aspnet_regiis -i” -line and smack, It started working again 🙂 Apparently there was something wrong with the config & .NET Framework & etc and luckily the aspnet_regiis was able to restore situation.

Posted in SharePoint 2010 | Leave a comment

SharePoint 2013 PeopleEditor

Okay I am back and I have something in my mind.

So now the SharePoint 2013 is available and I am developing software upon that platform. Now very first things what I found from the change list was intresting “new” peopleeditor. When you create standard SharePoint list & add column that is type of People, then you’ll get the new looking people editor which allows email addresses and more importantly shows search results on below the editor.

The old peopleeditor got a few new properties such as “AcceptAnyEmailAddresses”, but more importantly there is new control named “ClientPeoplePicker”. This picker is actually being used in built in SharePoint forms. Old picker works the way it should be but this is intresting new control and I am still exploring the differences.

Posted in SharePoint 2013, Uncategorized | Tagged , , | 2 Comments

Workflow starts and immediately gives “Error Occurred”

Yet one small thing to remember and I hope that someone else will find this posting useful. Consider following scenario: SharePoint Workflow (Visual Studio Worklow -style) runs fine on development environment. From development the workflow is brought to testing (or production if not the happy world) by using wsp’s or other methods.

In testing the workflow immediately gives message “Error Occurred” and in SharePoint logs following line is found with category of Workflow Infrastructure: “Object reference not set to an instance of an object”. In this case I found that this error message is given as the Content Type that workflow uses is not found on Task List. Usually this one goes well when doing a new deployment but if you have deployed earlier and update your workflow with changes to content type then this is possible error.


Usually “Object reference not set to an instance of an object” means that something is missing. It can be missing column from the list or in this case missing content type. This is relatively easy to fix (associate a content type to tasklist or as update procedure delete existing tasklist and create new one from workflow association screen).

Posted in Uncategorized | Leave a comment